Recently I wrote about MPC’s visual effects for the anti-gravity swimming pool scene in Passengers after talking to overall VFX supervisor Eric Nordby. MPC had plenty of other challenges to solve in the film, too, including how to realize scenes of the spacecraft, the Avalon.
Here Nordby runs down three things he and the team at MPC had to tackle specifically with the 1000 metre long ship, from design to scale and then coming up with an appropriate environment and lighting in space – something that’s harder to do than you think.
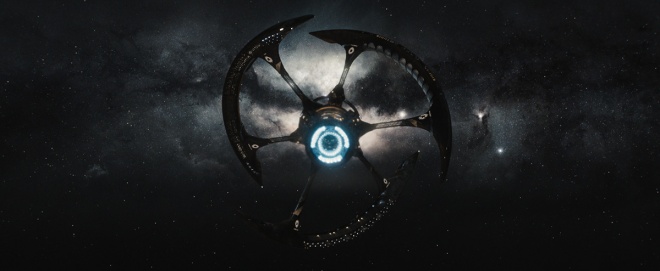
Challenge #1 – A ship design that felt like it served the story
The story being, it’s this luxury cruise ship in space that has to also transport 5000 people as well as all of the cargo and the rest of it and not just feel like a freight liner. So Guy Dyas, the production designer, broached that quite early on. He was inspired by, of all things a sycamore leaf, which is a leaf that when it eventually falls, it helicopters down towards the ground. And it’s got this very beautiful sweeping design to it. And so that was an early inspiration, to go back to the natural world. That formed the basis of it and then we just went from there and modified the ship where we needed to modify it.
Challenge #2 – Selling scale
This is a huge challenge to visual effects, especially when you don’t have anything close by. And because we’re in deep space for the entirety of the movie we’re never really close to anything. There’s one moment where you pass by a star but the vast majority of our exterior shots are just ship and then a very, very distant star field, a star field that’s light years away. So we’re never close to planets, we’re never close to other ships. So to really wrap our heads around the appropriate scale it required some heavy thinking on what we could afford to operate, what we could afford to really add that sort of geometry component to it that wouldn’t kill us in render and the rest of it.
And so what became the guiding principal was to art direct the shot. So we would stage the shot, and then whatever we got close to we would just pour whatever resources we had into doing a paint up and whatever we had in terms of atmosphere and all this stuff we wanted to add in order to sort of help us scale.
Challenge #3 – Exposure and speed
As a result of us being in deep space and not close to any stars, we sat down with Rodrigo Prieto, the director of photography. A large portion of the movie is in exterior space and we wanted to pick his brain on how he would see that. We’ve seen some incredible work lately, both Interstellar and Gravity and others. We’d been going with this very, very high-key harsh light that immediately you get a huge mileage out of because it feels very NASA-like, it feels like what you would see in actual space photography – a very blue, harsh, one light, intense fall-off shadow. And so we talked about whether or not that was a possibility for him.
Well, firstly, it would be a complete cheat because we’re not close to any sun, and secondly, he didn’t like the fact that it would be a very ugly light for the amount of stuff we had in this movie. It would have pulled away from what he felt his overall lighting design was going to be, which I thought was great because it allowed us to create this lighting dome which was based on essentially a nebula as opposed to any single source, which we kind of designed with a very soft ratio that was more similar to how Rodrigo was lighting the interior of the ship.
The next big part of that challenge was, how do you get that to look real?, because obviously exposure-wise when you’re actually shooting astral photography you’re actually photographing nebula and distant galaxies and there are such extraordinarily long exposure times nothing we’re going to do is going to be in that world. And so we really had to strike a balance of what we thought felt overly designed or under designed.
So we created a continuum of images for Morten and Rodrigo before we shot a frame of film, and we went all the way from extraordinarily stylised Guardians of the Galaxy-like – a very colourful world that worked so well for that movie to just International Space Station space walk photography. And we just talked at length about everything in between and found our area that we felt comfortable with. And then from there we could backpedal and start to paint up our space-scapes and then try to get some depth in those space-scapes and create this absolutely massive build that would form the setting for the entire movie.
Remember Turbulence? It was a much-hyped disaster flick set on a passenger 747 starring Lauren Holly and Ray Liotta, and released 20 years ago. The film may not by one for the history books, but its visual effects – a hybrid of miniatures and digital techniques – came right at a time where film VFX were transitioning heavily to CGI.
In honour of the film’s 20th anniversary, vfxblog spoke to visual effects supervisor Mark Vargo, who was also credited as a second unit DOP, about how he and teams from Boss Film Studios, Pacific Title Digital and other effects shops handled the work – including depicting the jetliner amidst a wild storm, having it flip over, and an exciting crash into a rooftop carpark. Included are several behind the scenes images and clips of the miniatures work.
Need a refresher? Watch the trailer:
vfxblog: It’s 20 years ago, which is still in the early days of CGI – where was Turbulence in the mix of visual effects techniques?
Mark Vargo: It’s one of those projects that’s right on the cusp of the studios not being quite ready to go digital, but any of us that had had some experience with it thus far were trying to do as much as possible. And so the movie’s kind of a wonderful hybrid of models and miniatures and towards the end with the F-14s – those were all digital airplanes. And then we did a lot of air-to-air stuff shooting a real 747 from a Learjet.
vfxblog: Let’s talk about that Learjet footage – how did you actually tackle those from a technical point of view?
Mark Vargo: Resolution was the hardest thing because we were using a periscope camera that was not very sharp. And we were shooting just four perf, it wasn’t VistaVision or anything like that. So really just maintaining the integrity of the image – we would over-expose a little bit, get as much detail as possible. But I was never real happy with the quality of the aerial footage, so what we ended up doing is degrading the visual effects footage as well so it would inter-cut okay. You know we had to use filters and we actually double-duped, that is, made an inter-positive and an internegative of some of the stuff we shot on stage just to match the infrastructure, which would of course be easy to do today. But in those days you would literally be cutting from a real 747 to a model shot.
Boss Film crafted the miniature 747. Photo courtesy Berton Pierce.
One thing we would do is create these dives by – one plane would go one way and the other plane would go the other way to increase the intensity without undercranking. I don’t like undercranking, so most of it was shot at 24 fps and maybe at the most 22 fps.
But the biggest problem with the movie, and me and [cinematographer] Lloyd Ahern commiserated on this, was that it was a white airplane. It was the only plane we could get, and the studio didn’t want to paint that 747. Can you imagine how expensive that would be? So we always complained about it being as if the plane was like mashed potatoes on white bread sandwich, that kind of thing. It was hard to get contrast, basically.
A cockpit set surrounded by greenscreen for Turbulence.
But at the end, at night, when it landed in that rainstorm – which was a real rainstorm – it was very helpful that it was a white aircraft because at that time the film stocks were still only 400 and we didn’t really want to push it. So there was enough exposure there at 2-8 when it landed. And it was a really great thing that it did land, because on the night that they did the whole sequence where she got off the plane, it happened to rain, it was in LA, and I was saying to myself well what are the chances that we’ll get another rainstorm? And we actually got a really huge storm. I mean, it’s like you maybe get like three of those a year.
vfxblog: You mentioned this being a hybrid film in terms of its visual effects, but how did the decision to use miniatures happen?
Mark Vargo: Boss Film had a 747 already built, a big one, and it was something they used again for Air Force One. It had this incredible wingspan, something like 20 feet. They had to do a couple of different pick points for a couple of the moves the plane had to do, and then we decided to do it orange or tangerine screen, and with a backlight pass as well, the idea being that it would be easier to composite. The plane was shot motion control and then digitally composited.
Above: Interviews with some of Boss Film’s model builders on Turbulence. Video courtesy Berton Pierce. Photo and footage credit: Rick Hilgner. Additional photo credits: Bruce Macrae and Greg Jein. (As seen in Berton Pierce’s Sense of Scale documentary).
vfxblog: The 747 was filmed on a marionette rig, wasn’t it?
Mark Vargo: It was. It was a very heavy plane, and the screen was enormous as well. I know that we had to patch in a lot of orange screen around it. And that stage wasn’t that big either. I think I remember talking to them about, well, can we get a bigger stage to do this in? And everybody wanted to because, I think, for one of the shots I think they had to take the stage door off and build a canopy outside to get far enough back for a wide shot of that model. And then we had a smaller model, like a six foot one for the extreme long shots.
vfxblog: What other kind of practical effects were involved?
Mark Vargo: We had this enormous main cabin that was probably 80 feet long that was on a gimbal, and a particular section could flip all the way around. So that was the most expensive thing, but that was also done practically. I mean, it actually did a 360.
The 360 gimbal.
vfxblog: One notable aspect of the plane shots was the way it would go through clouds, and also kind of disturb them. Can you talk about how that was done with the multiplane technique?
Mark Vargo: The clouds were huge cotton ball things, and they were on trolleys. In the wide shots of the model 747 going through the storm, those were just like huge cotton ball or fibrefill clouds on trolleys. That was kind of my idea to make clouds because right before I worked on Turbulence I did the new TriStar opening with the horse and the wings. Remember the digital version of that? Well I shot that with a backing and fake clouds that we had move, and I was sold on that. I mean, it looked real. It looked hyper-real, perfect for a movie logo, but that’s only because we lit it that way and I figured we could make these cloud banks.
Well, they looked at me and they thought I was just nuts. But I said no, it could be really, really dramatic, and we could put flashbulbs in there and create some lightning and actually get, for the amount of money that it’s gonna cost to build these cotton ball clouds for background plates, we can use it 20 or 30 times and it’s really going to amortise into being something that’s affordable and cheap to make. And there was a whole level of compositing and matte painting behind that too.
vfxblog: There’s that signature shot of the plane hitting the car park as the landing gear comes down and it then takes the truck with it – what was involved in just making that shot possible?
Mark Vargo: We did it practically. It was a 707 landing gear, it wasn’t 747, and we had the Jeep and we had the rig and it was on this gantry thing and we set it up in a real parking lot and had the lights of the plane coming towards us. That was an optical. It was really only two angles on the real jet hitting the truck, and my biggest fear was not the scale of it working because it was one-on-one scale, but the speed of it.
When you think about that today, because the stall speed of a 747 is like 170 knots, and when you think about something that big, that heavy, that massive, hitting like a mini pickup truck, it would have literally just obliterated it. And so it was a lot to ask, but since nobody had ever seen it before you say, well this is what it looked like. And because it was so violent and I think so very well edited people just bought it. And then we shot the other cars off of that parking structure at LAX, actually catapulted them, those are real cars being thrown off the roof.
Above: A series of the aborted landing shots from Boss Film. Video courtesy Johnathan Banta.
vfxblog: What about explosions in that shot?
Mark Vargo: We set off explosions. Yeah there’s no substitute for that. Just gas going up. The caveat was it would probably only work once. We didn’t know what was going to happen to that landing gear, and there was very little cleanup. In fact, I don’t even think there was any cleanup. In those days roto’ing live action plates was a real dicey, dicey thing and I know there was no enhancement added to it. And then the F-14 guy had to shoot it off the landing gear on final approach there, which is a lot to ask but I mean it was okay. I mean it’s, what are you gonna do? You gotta get rid of the truck before you can land.
Landing gear and jeep miniature. Photo courtesy Berton Pierce. Image credit: Bruce Macrae.
vfxblog: Some of the visual effects would these days be considered ‘invisible effects’ such as some of the interiors of the 747 done by Pacific Title Digital. What do you think made those scenes work so successfully?
Mark Vargo: Well, we shot a lot of it not doing much compositing at all. A lot of the stuff we did of them flying was actually at LAX with a black behind the cockpit shooting through the windows of that 747. And then there were several scenes with greenscreen, but basically if you’re sitting in a cockpit at night as I did – I was able to go from Los Angeles to Seattle, which is where we based out of for some of the storm footage – if you’re not looking down at the ground and off at the horizon it’s absolutely black. And that’s with the naked eye. So we just went with that rather than putting something that wouldn’t match.
vfxblog: Looking back to that time, what do you think is a lasting memory from working on Turbulence?
Mark Vargo: You know, one of the big things was we didn’t want it to be a bunch of static shots. We wanted it to be as kinetic and as visceral as possible with the grace of a big plane put against a big storm put against a maniac inside, and I think we succeeded. I really do.
The 747 under construction at Boss. Photo courtesy Berton Pierce.
And I think that it was that next step towards convincing people that there’s a lot more flexibility in digital effects. Yes, I still think there’s a place for models, even today. That whole approach to that hotel in LA, and the karaoke bar where the landing gear goes through the top of the roof, which was all done practically. I thought that looked pretty good for the time – a one-take thing. But I thought it was a wonderful hybrid project where as each visual effects movie further on occurred there would be a little less practical physical effects and a little more digital effects.
Thanks to Mark Vargo for participating in this interview. Check out his website at http://markvargo.com.
I interviewed director Chris Wedge (the co-founder of Blue Sky Studios) about making Monster Trucks, his first live-action feature. Check it out at Cartoon Brew.
Now that we’ve all seen Rogue One five times and deconstructed the storyline, the characters and the visual effects, it’s fun to also consider how some of the iconic shots came to be. Of course, ILM and Lucasfilm’s art department crafted many of the incredible concepts, but some of the first shot designs were done by the previs team at The Third Floor.
The Third Floor also helped establish ways for visualizing and planning the shoot, and choreographed incredibly detailed scenes such as the third act battles, thanks in part to a tool called Random Cam. The Third Floor previs/postvis supervisor Barry Howell takes vfxblog through the work.
vfxblog: Previs has become such an important tool to help filmmakers have a blueprint about what to shoot and for vfx studios to tackle shots. But what were the very first things The Third Floor did on Rogue One to get started on such a huge project, especially when you have a seemingly clear slate?
Barry Howell: We were thrilled to join the project, of course because it was a Star Wars production and also because myself along with The Third Floor’s other five founders met while working as previs artists on the “third floor” of Skywalker Ranch on Star Wars Episode III: Revenge of the Sith. So there was a bit of legacy there.
We had created the previs for Godzilla and were especially excited to support director Gareth Edwards again in realizing the creative ideas he and the producers at Lucasfilm had for the movie. Our first phase of work began in the art department at the Presidio, working with Production Designer Doug Chiang. The majority of that time was centered on building assets and environments for previs that reflected the concept art Doug and team were creating.
While this was happening, we kicked off a satellite team from The Third Floor London office, led by my co-supervisor Margaux Durand-Rival, at Pinewood. As things were being prepped to start previs sequence-building, I had the team create some animation cycles and vignettes of action based on ideas Gareth had passed to me that would later help us populate some of the bigger scenes, such as the epic ground battle at the end of the movie, very quickly.
I joined the Pinewood team once production fully shifted to the UK and we began developing previs for multiple sequences. Asset creation continued for quite some time, longer than most projects, mainly due to the sheer volume of unique creatures, vehicles and environments that needed to be created. In addition, whenever new designs were available we would ingest assets from ILM and the art department so that the previs reflected the latest and greatest that Gareth had approved.
In addition to creating shots, we also had the opportunity to do some look development and test studies for the big Death Star test firing moment. This included creating diagrams showing possible blast radiuses and potential waves of destruction from a variety of locations in space and from the surface.
vfxblog: Can you talk about the 360 environments used on set to help with lighting and what TTF’s role in these were?
Barry Howell: We worked closely with ILM, including Visual Effects Supervisors John Knoll and Mohen Leo, to create content for the LED screens. The LED setup presented a truly unique opportunity to use previs in a whole new way. Gareth wanted to immerse the actors into virtual backdrops at times when the script called for them to be inside any of the numerous cockpits, such as the U-Wing or X-Wings. Rather than looking at blue or green screen, the performers could react to the previs environments that would cast lighting and temperature cues similar to what the final visual backdrops would be. This was useful in lighting the performers more realistically and would aid in integrating them with the final effects.
We started by adding detail to the texture and geometry of our pre-existing previs environments. We then lit them according to what was needed for each setup, using a plugin to generate large-scale 360-degree spherical images straight from Maya’s Viewport 2.0 display.
From there, ILM would bring the footage into TouchDesigner, calibrating the images to optimize for brightness. These were then played back on set and sometimes combined with other elements, such as explosions or incoming laser fire. All of this was triggered via a tablet operated by John Knoll. The first time we walked onto set and saw the big screens playing out one of the previs renders, he came over to show us this setup and with a push of a button sent the entire room into hyperspace. Simply incredible!
vfxblog: What were some of the ways the director could use previs on set, especially in terms of using it to find different POVs? What tools were used for this? What did you deliver to make these possible?
Barry Howell: One of the things Gareth said he liked about previs was that it gives him a solid guide to reference when he gets to set and it allows him to show other departments some of his ideas in motion to bring everyone on the same page. But at the same time he also likes being able to go rogue with the camera and explore other angles while on set that may not have been visualized by drawing boards or animating previs.
To help with this, we created a new tool called Random Cam. With this, we could take any previs shot, select a few points of interest, prioritize them and set a boundary area for the camera to move around in. From there, the tool could auto-generate hundreds of new and unique viewpoints based on the criteria we had established. Some angles produced by the tool would be complete rubbish, but there were always others that Gareth would like.
vfxblog: Can you talk about the previs specifically for Jyn’s ship escaping from Jedha? What were the important beats here, and how were different and complex parts of that scene, such as the mass of debris, realized?
Barry Howell: The Destruction of Jedha was one of the most fun scenes to work on, mainly because the director gave us amazing latitude to explore some of our own ideas. He provided some concept pieces that he really liked to use as a guide for how massive the destruction would be, briefed us on the main beats he was interested in seeing and let us run from there.
The sequence was originally planned for a different type of planet so we did a couple of variations. By the time they were shooting the LED plates, we adjusted the previs to match the desert planet setting and rendered a 360 of debris falling around the camera for them to see how that would possibly cast shadows on the actors and interior of the ship as it left. The previs shots we delivered provided a lot of options to experiment with editorially.
vfxblog: The X-Wing attack on the Scarif Base required some complex choreography – can you talk about the virtual cinematography principles here. How did you ensure the sequence was watchable and coherent? Can you also talk about how various assets for this sequence were built and whether you used ILM models/iterations?
Barry Howell: We worked on the rush through the Space Gate early on then, towards the end of the shoot, we worked on developing the “battle” section. Gareth knew that the space battle was going to be epic and fun, but also that it featured substantial digital imagery and he wanted us to concentrate on scenes that involved the actors while they had them. As they got closer to the end of the shoot, he showed us ideas in storyboard form he had designed with Matt Allsopp, his lead concept artist. He asked us to animate a series of actions with multiple squadrons of X-Wings and Y-Wings making attack runs on the dry dock. He wanted us to visualize each of these actions from several POVs and provide that footage to editorial so he could begin fleshing out the structure of the sequence with his editors.
I did a rough graphical overview of the entire battle based on Gareth’s ideas using three-dimensional arrows to indicate where each of the squads were located at different moments. After that, we distributed these “events” to different previs artists to work through and create shots from, which were fed to editorial. We then packaged up our scenes and delivered them to ILM, where they imported them to the virtual camera stage for Gareth to direct.
Images copyright Lucasfilm and courtesy of The Third Floor, Inc.
Doing some research for an interview with Trollhunters showrunner Rodrigo Blaas, I started watching the show on Netflix, and basically didn’t stop. It’s like a feature film, in fact, it was originally a feature film. But it also feels very serialised and totally suits the new binge-watch culture. Check out my eventual interview here, at Cartoon Brew.
For 3D Artist magazine, I got to profile the Vancouver studio Image Engine. I’ve been in touch with them ever since their incredible breakthrough work on District 9 – so great to see what they’ve produced over the years.
Rogue One. The Jungle Book. Fantastic Beasts. Game of Thrones. Plus all the major Vancouver facilities at the careers fair. And an innovative Women in VFX session looking at how to get more women working in the industry.
That’s what you can see this year at Spark FX in Vancouver, which is happening Saturday 4th February at the Vancouver International Film Centre.
The presentations at Spark are even more impressive considering many of those films and shows are Oscar and VES nominated, and feature some of the top talent in VFX right now.
Careers fair at Spark FX.
I’m going to be there, too, moderating the Women in VFX panel, featuring artists and supervisors from Imageworks, Dneg and Image Engine.
Here’s how it works – head to the Spark FX site and click on Online Reservations. The sessions are generally $20 each. The Women in VFX session is free. I’d get in now because they tend to sell out pretty quickly.
You might have seen former ILM visual effects and animation supervisor Steve ‘Spaz’ Williams pop up on vfxblog quite a lot recently. That’s because he was involved in a number of seminal VFX films celebrating their various anniversaries of late, including Terminator 2: Judgment Day and Jurassic Park.
Williams was also involved in another landmark – and somewhat notorious – moment in visual effects, when George Lucas revisited his original Star Wars trilogy for the ‘Special Edition’ releases. In particular, Williams was asked to animate a digital Jabba the Hutt for a deleted scene from A New Hope when the gangster confronts Han Solo on Mos Eisley.
The scene had been shot for the 1977 release using a stand-in actor (Declan Mulholland) for Jabba, with plans to realise the sequence with a puppet or stop-motion character. But, as Williams recounts in this chat with vfxblog, it wasn’t until the ‘Special Editions’ – released 20 years ago this week – that Lucas felt he could take advantage of advancements ILM was making in CGI to complete the scene and have Jabba moving along the ground, unlike how audiences had previously witnessed the creature in Return of the Jedi.
vfxblog: Let’s set the scene a little bit – you’d worked on Terminator 2 and Jurassic Park, and also The Mask, by the time you started working on the Jabba scene, right?
Steve Williams: Yes, George specifically asked me to do the Jabba sequence. It was me doing the animation and Joe Letteri CG supervising it. George said that he’d shot this sequence with an Irish actor [Mulholland] playing Jabba. He never liked the sequence. He personally did not shoot it, it was shot second unit at Shepperton.
And he also said they had lost the original negative to the sequence. Disappeared. So, we had no script notes, we had no camera notes. I said to George, ‘Listen, there’s no set information or camera information for it.’ And he goes, ‘Well I shot the whole movie with a 35mm and a 50mm, that’s it.’ I looked at the scene and went, well, it’s a 35 and a 50, that’s all it is. So what we had to actually process was the IP, which was the inter-positive, which is a first strike off the neg.
An on-set shot of Declan Mulholland with Harrison Ford as Han Solo during filming of the scene in 1977.
vfxblog: What do you think it was that made Lucas confident enough to go with CG?
Steve Williams: Well, it was the previous work we’d been producing but it was kind of a big deal because it was almost some of the first lip sync that we were actually doing in computer graphics. They were concurrently working on Dragonheart at the same time.
vfxblog: So were you taking advantage of the CARI system that had been developed by Cary Phillips for Dragonheart at ILM?
Steve Williams: CARI didn’t exist then when I animated Jabba. What we did was just have phonemes that were formed in Softimage version 2.6.1 using a scratch tracker or synchronizer, and scraping over the track. It was literally about breaking down ever phoneme to every frame, and that’s how you break down sound based on a dope sheet. I used a horizontal dope sheet, literally handwritten with cartoons everywhere!
CG animation model for Jabba.
vfxblog: So you were responsible for animating Jabba, but can you talk about the other things that helped bring him to life?
Steve Williams: Well, I think Alex Seiden came on to help us with that as well. Then Joe Letteri was doing all the shaders, he did all the displacement maps, all the shadowing, all the lighting. And Joe’s a master. He’s still the best in the world in my view. I mean, look what he did with Peter Jackson’s King Kong, which to this day in my view is the best, one of the best computer animated characters I’ve ever seen. The emotion, the face, of that creature is unbelievable.
vfxblog: Now, you had the plates from 1997 but Boba Fett was also comp’d into the scenes, wasn’t he?
Steve Williams: Yes, that was actually an animator at ILM, Mark Austin. And Mark was a huge Boba Fett fan. Lucas had me shoot the insert shots of Boba Fett, which is in fact Mark Austin. So Joe and I just matched up the lens, and I just shot Mark bluescreen and he was comp’d in.
Steve Williams (left) and Mark Austin rehearse the Boba Fett insert shots.
vfxblog: A lot of things George changed for the Special Editions were controversial but what do you remember was some of the reaction to CG Jabba at the time?
Steve Williams: You know, a lot of people pissed on it because Lucas had insisted having the Harrison Ford character walk behind Jabba and step on his tail and go down, and it just – it never ever looked right. It never looked right in my view.
vfxblog: There was also the challenge, wasn’t there, of matching Jabba to what he looked like in Return of the Jedi?
Steve Williams: You’re exactly right about that. So what George said specifically to me was, ‘Imagine Jabba under a Jenny Craig program.’ He goes, ‘I want a slimmed-down version of Jabba.’ And, I mean, the thing that was kind of most captivating about the practical Jabba was the amount of slime coming out of his mouth. George didn’t want any of that stuff. We actually were doing ‘blobby’ technology at that time and we could have adequately done that.
vfxblog: The other thing was, the Jabba we’d always seen was just lying down, but here he was moving. What did you do to try and work out a way for him to move properly?
Steve Williams: That’s a really good question because that was a question that I had for Lucas. And Lucas had to say one word and I got it, he said, ‘It reminds me of a slug,’ and I went, ‘Bingo!’ You know, I used to draw slugs. In animation school you draw a lot of things. And so we had to work out, how does a one thousand pound slug move? Does he have a spine? Is he just a gelatinous cacophony of hardened elephant skin with no spine, or does he have a spine?
And so if you could figure out if he had a spine – which I did, I built one for him because he had arms and shoulders and stuff like that. And that’s the whole thing with animation. In other words, if you can understand what the internal composition of the creature is you can understand how to animate it.
Following the 1997 Special Edition theatrical releases, the Jabba/Han Solo sequence was revisited again by ILM (which Williams had left by that time) for the 2004 DVD release, and the CG creature was replaced with one that looked closer to how he had appeared in The Phantom Menace.
This is site is run by Sascha Endlicher, M.A. during ungodly late night hours. Wanna know more about him? Connect via Social Media by jumping to about.me/sascha.endlicher.

 Recently I wrote about MPC’s visual effects for the anti-gravity swimming pool scene in Passengers after talking to overall VFX supervisor Eric Nordby. MPC had plenty of other challenges to solve in the film, too, including how to realize scenes of the spacecraft, the Avalon.